Showing posts with label chipboard. Show all posts

Monday, March 18, 2013

March Sketchy Challenge

For this month's Sketchy Challenge at Canadian Scrapbooker, I decided to have some fun with another new Bo Bunny collection called "Family Is..."
I am POSITIVE that the paper designers at Bo Bunny had a real life peek inside MY family when they came up with these hilarious and playful stickers...
Here is Sue Sykes' awesome March sketch...

Immediately I thought of some recent pics of my teenagers.  Sure, I had one "good" shot of them together for DramaQueen's birthday, but why scrap that photo when I had 10 other funny outtakes?  


I love the colourful, bright patterns....a reflection of my chaotic, loud teens!

Using the card stock and chipboard stickers makes designing a breeze...


I also did a fast forward video of how this layout came together. [You can click HERE to go to YouTube and watch on a bigger screen.  You can also click "Subscribe" if you'd like to watch all my videos]

I hope you can join in the fun over at the Sketchy gallery this month!  It's a friendly online community with lots of inspiration!

Wednesday, March 13, 2013

Time Travel

Today I thought I'd share a few layouts I designed for my "Time Travel" article in the Spring issue of Canadian Scrapbooker magazine.

Creating heritage pages and vintage designs is one of my favourite styles of scrapbooking.

FabScraps was perfect to use for this layout "Farm Girls,"  featuring a photo of my mom and her cousin in the farm yard.  Why are they wearing pretty white dresses and playing outside?? It's probably Sunday!


I used The Crafter's Workshop chicken wire stencil and Stephanie Barnard/Clearsnap black spray on the background paper.
The title was cut with a Cricut.

The crocheted doily was bought at a garage sale last summer.

I coloured the chipboard elements with inks.

My next layout is made with beautiful Melissa Frances products....
The photo is my cousin Cindy who grew up on the same farm as my mom did!

To make this flower, I just covered a chipboard circle with liquid adhesive and wound the ribbon around.  Then I added a pretty pearl bling centre.
I also made some simple spiral roses...
The alphabet stickers and white resin pieces are also Melissa Frances.

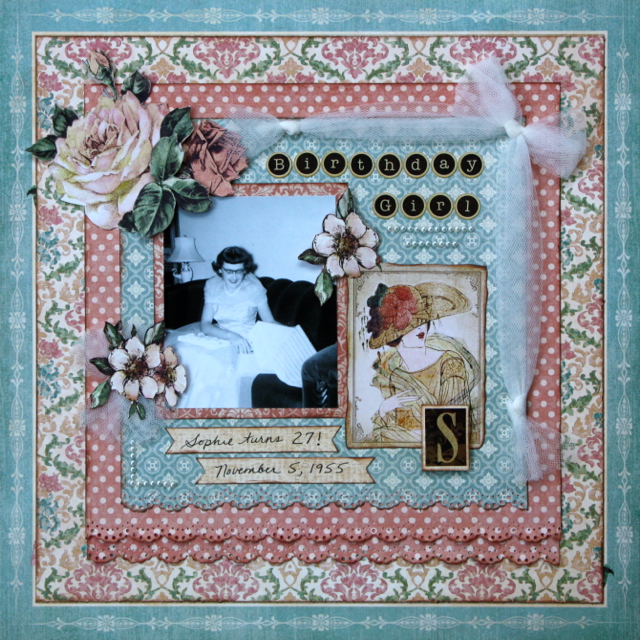
This last layout was designed with the gorgeous Graphic 45 "A Ladies Diary" collection....

My mom's 27th birthday!  Love her dress.

Here are some close-ups. 
I fussy cut these roses and leaves from the patterned paper.

The alphabet stickers are Graphic 45 too, and the pearls are Stampin' Up
A very sweet friend of mine, Michelle Marks, also used Ladies Diary and designed this gorgeous vintage tea box and mailed it to me for my birthday....


Click HERE to visit Michelle's blog and see a tutorial on how to make this tea box.  

I love it, Michelle!  Thank you so much.

And thank you, Canadian Scrapbooker, for giving me the opportunity to design and write "Time Travel." 

My heritage pages are precious to me, and I really enjoy sharing them with all of you.

Monday, February 25, 2013

Guest Designer for 13 Arts

This month I was invited to be a Guest Designer for 13 Arts and received some beautiful papers to work with! 

I designed 2 layouts:
For her 16th birthday last month, our daughter planned a dinner out with friends at a restaurant.  They dressed up and had a wonderful time...and this is the photo I took of her before their meal.

I used some dollar store bling and a doily and punched the pink paper with a Martha Sewart border punch.


The title I [heart] U are letters cut from an alphabet on one of the pieces of paper.
The heart is a special technique I will share on another blog post in the near future.

The dress form is a Prima canvas element...
For my second layout, I decided to use a photo of my husband's parents' wedding...
The chipboard branches with birds is a Dusty Attic piece painted white and glittered...
I cut a tag from a piece of paper to use as my title "Love"...
Seam binding ribbon, cheesecloth and Prima flowers adorn the tag.
The white resin corner is Prima.
I enjoyed the soft colours of these papers, and the patterns themselves created so much texture.  Loved designing with them!

I hope you have time to stop by the 13 Arts blog where you will find even more inspiration from their talented designers!  Click HERE to visit 13 Arts.

Friday, February 8, 2013

Graphic 45 February Place in Time

It's no secret that I love designing with Graphic 45.  The vintage themes are so inspiring!  

When I saw the "Place in Time" collection, I wanted to use every single piece of paper, so I decided to create a 12 x 12 album for my mother, using photos from her scrapbooks.
My mother's precious scrapbooks
Her birthday is in November, so I have lots of time  to design the layouts.  Although I am teaching this album as a class at The Urban Scrapbook using double page layouts, I will only share the single pages and some techniques here on my blog each month. 

Here is my February layout...
Whoa Mom!  Two men...not one!
The large distressed heart in the top right is made with Tim Holtz Ideology Tissue Wrap and chipboard.  Here is how I created this special page element.

First, I cut a heart template from scrap paper and traced it onto a piece of chipboard.

 I tore off a piece of Tissue Wrap that was larger than the heart.


Using a foam brush, I applied Mod Podge all over the heart in a thin layer.


Crumple the Tissue Wrap and press it down all over the heart, scrunching it into wrinkles as you do so. 


Flip the chipboard heart over and apply Mod Podge to edges only.


Trim off excess Tissue Wrap and press down flat along the edges of the heart. 

Rub the entire ink pad of Aged Mahogany Distress ink across the Tissue surface of the heart.


Because the Tissue Wrap is somewhat resistant to colour, I rubbed off the excess ink with a dry baby wipe.
I wanted the colour to have more of a brown tone, so I added some Vintage Photo Distress Ink.
Remember to wipe off the excess ink.  You can continue to layer the ink like this until you achieve the desired colour.

On my layout, I backed the heart with a heart doily, that I found in the Dollar Store.  

I hope you have someone special in your life that you can give your own heart to this month :)