Showing posts with label stencil. Show all posts

Friday, May 31, 2013

ScrapThat! Kit Club June Reveal and Blog Hop


Welcome to our ScrapThat!
 June Kit Reveal and Blog Hop!! 

We are so happy to see June after the long winter and excited to show you our creations with our beautiful Prima Collection "Sunrise Sunset" !

Here are my two layouts....the first one is based on Amarilys's lovely sketch.


I designed my second layout using Prima's May BAP Sketch.
Here is the Prima sketch:

I made a video to show how this layout came together, in fast forward, using this sketch.

You can click HERE to watch this video on YouTube and subscribe to my Channel to qualify for the Hop prize. As well, I will have a video tutorial later in June to show how I altered the metal butterflies.

Our Blog Hop features 9 fabulous hop sites including our Design Team blogs. 

If you came here from:
you are on the right track!

If not, go back and start here: Scrap That!   
Then follow the rest of the order:
Kelly Klapstein YOU ARE HERE
ScrapThat!
 
We are so happy to welcome the amazing 
Zoe Nemburt
as our June Guest Designer!!!


Hey, my name is Zoe Nemburt, and I am absolutely thrilled to be asked to design as a guest for ScrapThat! this month. I started scrapbooking in 2009 and seriously never looked back. I felt I had finally found my crafty passion!! Super Excited to be here for the month of June with the ScrapThat! team and I really hope to inspire you to create something fabulous.

Be sure to stop by Zoe's blog, Designs by Zoe, to be inspired by her gorgeous work! 

We are sad to say farewell to our talented DT Member, Sarah Routledge.
We have been inspired by your creativity and learned so much from your tutorials. 
With your optimism and talent, we are sure you will reach every dream.
You will be missed.
We wish you luck on your new endeavors! 

Now, without further ado....  

Introducing our June Kit,
 "From Sunrise to Sunset"

Featuring the designs of the fabulous Anna Dabrowska (a.k.a. Finnabair) we present a  collection of rich colors and designs that run from brights to neutrals. Whatever your scrapping style is, you will love this kit that is just chock-full of Prima goodies!

Take a look:

Main Kit


Paper Add-On

Flower Add-On

 Embellishment Add-On

More details on this collection can be found here:
ScrapThat! Store 

We are currently accepting new
Kit Club Members.
For more information,
complete the form on the link below:
New Subscriber  

Look at the beautiful sketch Amarilys has created for June: 


See details about the challenge here: Sketch Challenges

We have something new for June!
In addition to Amy's sketch challenge,
 other members of the DT will also be hosting challenges!


  • Tracey G.'s challenge: "Scrap out of your comfort zone"
  • Laura's Challenge: "Using a long title"
  • Sandi's Challenge: "Color Challenge"
  • Tracey S.'s Challenge: "Use a stencil"
Check them out here. 

Everyone is welcome to participate.
Entries for all challenges are due by Wednesday, June 26.
 All winners of our challenges, including Layout of the Week, are eligible to receive 10% off any 2012 Kits ~ including Add-ons!


The June Blog Hop Prize is our "Life's Muse" Main Kit featuring Webster's Pages Everyday Poetry Collection (Webster's Poetry)


To qualify for this month's FABULOUS Prize, you must complete the following:
  • Visit each blog listed on the hop to see what each designer has created using this month's kit and sketch (comments are very much appreciated).
  • Each designer's blog hop post will feature a word or two that will make up a secret sentence, collect these words along the way.
  • You must become a FOLLOWER of each blog along the way and LIKE us on our Facebook Page!
  • Subscribe to Kelly's YouTube Channel at http://www.youtube.com/user/kellycreates
  • Post the ScrapThat! Blinkie on your blog.
  • For your last stop on our Blog Hop return here to the ScrapThat! Chat Blog. Leave a comment letting us know you have completed the hop.(Please do NOT include the secret sentence in your comments.)
  • Email the secret sentence to Tracey Sabella: tracey@scrapthat.ca
The Blog Hop ends Sunday, June 2 at Midnight EST.
The prize MUST be claimed within 3 days of the forum announcement which will also be made on the ScrapThat! Blog.
~ If left unclaimed a NEW winner will be chosen ~
**Winner will pay actual shipping costs for sending the kit from Canada.**
Shipping costs will be invoiced via PayPal unless you are a kit member,
 then your prize will be shipped with your monthly kit.
Prizes won during the month will be mailed out the first week of the following month.
Due to Customs clearance, International mailings sometimes take 30-75 days to receive.

My secret word is:
LIFE

Next hop over to

For your final stop, return to the ScrapThat! Blog 
to let us know you have completed the hop.
Remember ~ only send the secret sentence to tracey@scrapthat.ca
Happy Hopping!

***********************************************


Wednesday, March 13, 2013

Time Travel

Today I thought I'd share a few layouts I designed for my "Time Travel" article in the Spring issue of Canadian Scrapbooker magazine.

Creating heritage pages and vintage designs is one of my favourite styles of scrapbooking.

FabScraps was perfect to use for this layout "Farm Girls,"  featuring a photo of my mom and her cousin in the farm yard.  Why are they wearing pretty white dresses and playing outside?? It's probably Sunday!


I used The Crafter's Workshop chicken wire stencil and Stephanie Barnard/Clearsnap black spray on the background paper.
The title was cut with a Cricut.

The crocheted doily was bought at a garage sale last summer.

I coloured the chipboard elements with inks.

My next layout is made with beautiful Melissa Frances products....
The photo is my cousin Cindy who grew up on the same farm as my mom did!

To make this flower, I just covered a chipboard circle with liquid adhesive and wound the ribbon around.  Then I added a pretty pearl bling centre.
I also made some simple spiral roses...
The alphabet stickers and white resin pieces are also Melissa Frances.

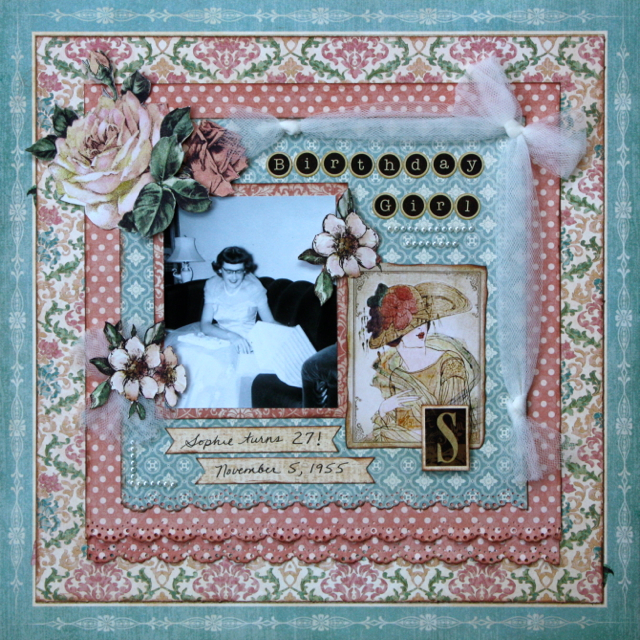
This last layout was designed with the gorgeous Graphic 45 "A Ladies Diary" collection....

My mom's 27th birthday!  Love her dress.

Here are some close-ups. 
I fussy cut these roses and leaves from the patterned paper.

The alphabet stickers are Graphic 45 too, and the pearls are Stampin' Up
A very sweet friend of mine, Michelle Marks, also used Ladies Diary and designed this gorgeous vintage tea box and mailed it to me for my birthday....


Click HERE to visit Michelle's blog and see a tutorial on how to make this tea box.  

I love it, Michelle!  Thank you so much.

And thank you, Canadian Scrapbooker, for giving me the opportunity to design and write "Time Travel." 

My heritage pages are precious to me, and I really enjoy sharing them with all of you.

Thursday, August 9, 2012

Colourful Cardstock

I find that I rarely use cardstock anymore and seem to gravitate towards patterned paper all the time.  

But our monthly staff challenge kits at The Urban Scrapbook ALWAYS have two or three sheets of cardstock in them (thanks Jan!) which forces me to try to use those solid pieces of paper in creative ways.

I decided to play with some Bazzill cardstock and papers for the August Canadian Scrapbooker Sketchy Challenge.

Here is the sketch by Jill Sarginson...
 And here is my layout...

 Yes, BoyGenius came home with a set of drums and announced he is in a band.  Does he know how to play the drums?  Nope.  But strangely, he does sound pretty good.  That's YouTube video tutorials for ya!

Here's how my mixed media layout came together.  I started out with this cheerful orange Bazzill cardstock...
...then distressed the edges with my favourite Prima Ingvild Bolme distressing tool.
 I decided to rock out and "go for the grunge"  with a stencil and some black gesso...
This is the same Crafter's Workshop stencil I used on my last layout...but this time I stenciled the stars.

There was still lots of black gesso on my stencil so I quickly turned it over and slapped it onto a blank page in my art journal...
HINT:  Use ink and your stencils to give your kids temporary tattoos!
I used Clearsnap Smooch Spritz to create these graffiti splotches and dripping effects (Cherry Ice, Black Velvet and Log Cabin)


Hold your paper upright and spray LOTS at the top of your page, allowing the excess colour to drip down to the bottom edge.
I also sprayed this Bazzill white cardstock circle with red and black Smooch Spritz...
 
Using Ranger's Glue N Seal, I adhered a torn piece of Bazzill Antique sheet music paper to the centre of the stenciled stars.  LOVE the lighter weight of this line of papers.

 To colour the music paper blue, I used Smooch Accent Ink and mixed it with water....a technique I learned from the talented Cathie Allen.
This Smooch colour is called "Azure" (please ignore my dirty stamping block)


First brush some Smooch Ink onto a clear acrylic stamping block.
Then mist with lots of water.

Now rub the colour from your block onto your paper.  I repeated this a few times for better coverage.
I also "Smooched" the Magenta chipboard guitar...
The guitar is coloured with "Wineberry" Smooch Accent Ink.
The title was a complete accident!  I had chipboard letters on a white circle I cut from Bazzill cardstock...and then decided to spray them on the white circle with Black Velvet Smooch Spritz.  I thought I'd throw away the white circle and make another circle for the title.

Well, when I dumped off the coloured chipboard "Rock Star" letters...I found I had used them as a mask and loved the effect!
Here's the original package of Magenta "Rock Star" chipboard, which has other pieces missing from other projects.
The Chili Peppers orange star logos are from the internet and are printed onto white cardstock, along with the journaling strips.
I think the journaling circle looks like a vinyl 45 record (yes, I'm THAT old!).  I wanted to use an actual CD, but thought it was too small.

My son just bought a Chili Peppers t-shirt, and that is where their circular name is from...I took a photo of the image on his black t-shirt, enlarged it on a Word doc and then printed it onto white cardstock.  

I often use smooth Bazzill cardstock to print out journaling with my computer printer.

So now I have a new love affair with cardstock!  Hmmm....you could even call me a "Bazzill Groupie."  

Rock on...and Craft on :)


Tuesday, August 7, 2012

A Very Special Kiss


The lovely "Palm Beach" collection from Webster's Pages was in our staff challenge August kit at The Urban Scrapbook.

This pretty pastel colour palette could be used for a number of themes...summer, beach, ocean, travel, tropical....and so on.

I chose to scrapbook a photo of BabyOfTheFamily and her first kiss....with a dolphin :)
The background base is actually cream cardstock that I inked with Peacock Feathers Distress Ink (new Spring Limited Edition ink), and I wavy cut the bottom edge...
 The second background layer is blue Bazzill cardstock, which I altered "mixed media" style with a Crafter's Workshop Stencil and some Gesso (by Claudine Hellmuth/Ranger).
I used the centre hexagon shaped part of the stencil along the edges of the background and applied the gesso with a paint brush.
Even my bathroom counter was altered with this hexagon stencil when I set it down to dry. 
HINT:  Wash off gesso carefully immediately after use.


I cut these banners from the WP chevron patterned paper and edged with Peacock Distress ink, then curled into wavy shapes using a pencil.

The Distress Ink also helped me alter this WP pink ribbon...
A quick and easy colour change with ink.
I used more ink, white paint and Clear Rock Candy Stickles to transform the chipboard fish...
The fish were cut from an Accucut die at The Urban Scrapbook.  They have a huge assortment of dies for customers to use!


The waves are cut freehand, edged with ink then curled slightly for dimension.
This border is painted with Patina, which is an opaque ink that colours metal and non-porous elements. 
 I wanted some of the gold gems to show through so I rubbed off some Patina before it was dry.
A fine-tipped paint brush helped me colour the WP gem border sticker with Ranger Patina "Verdigris"
The umbrella is fussy cut from one of the Webster's papers.
The first part of the title is stamped onto white Bazzill cardstock with Graphic45's Typewriter Alphabet stamp set...
 

The word "kiss" is created with DIY American Craft Thickers..
These Thickers have an adhesive top, which you can peel off and then add whatever you like to alter them....
 I added Craft & Glitz Glitter....
First I cut apart the letters I wanted to glitter.
Next, I removed the top adhesive backing and poured on the glitter.
After rubbing the glitter into the adhesive tops of the letters, I brushed them off completely.
....And then stuck these gorgeous glittery letters onto my page!
 I think I will invent a Glitter Vacuum...to deal with the aftermath of microfine glitter sparkling EVERYWHERE in my studio :)

The clean-up is the worst part, isn't it?  

The Urban Design Team created so many fantastic layouts with this kit.  Click HERE to visit their blog and see everyone's beautiful work!  

And drop by the store to pick up  your own August kit that is filled with summery goodness :)