Showing posts with label Big Shot. Show all posts

Monday, September 10, 2012

Bo Bunny Apple Cider Double Layout

When I was planning my layout class for The Urban Scrapbook in August, I searched out some fall collections and fell in love with Bo Bunny's Apple Cider!


The fall palette is beautiful and has a unique twist of lime green.

Here is my layout...
Our annual fall photo, October 2008 [when they would still pose happily together]
The brown background papers are Bo Bunny Vintage Double Dot "Chocolate".

I had my Vagabond humming for this one....lots of Sizzix dies used!

Tim Holtz: Branch Tree, Mini Tattered leaves, Mini Flourish, Autumn Gatherings and the Sizzix Spooky Fence

I cut the spooky fences from chipboard and then painted with Black Soot Distress Crackle Paint.
  
 The Autumn Gatherings tiny leaves and branches are inked with a variety of Ranger Distress Inks in fall colours.  

Inking the small leaves BEFORE removing them from the cream cardstock is easier.

Squished under the fences and other elements is wild moss.  And I tell ya, this moss is WILD.  Very difficult to tame!  [Purchased at Michaels]
I cut the tree from American Crafts "Cranberry" Duotone Glitter Paper. [Not really a cranberry colour actually]
The leaves are cut from Best Creation "Bronze Copper" glitter paper and AC Duotone "Caramel" 
 The scarecrow cameo is from a package of Apple Cider Metal Trinkets.

Here is the title element, using images from the "Cut-Outs" piece of patterned paper in this collection....

This pretty metal flower with the pearl centre is also from the Metal Trinkets package.

The "Fall" letters are cut from this same patterned paper and covered with Sookwang double sided sheet adhesive.  I added black microbeads.
The flourish is cut from Gold AC glitter paper.
The apples on this "Cut-Out" element are covered with Clear Rock Candy Distress Crackle Paint.
The pumpkin is also crackled and the cat is covered with Glossy Accents.
The special elements of this layout are the sunflowers...
The petals are cut from the reverse side of the Apple Cider Dot patterned paper.
I originally was going to stamp all the petals with 2 of these Heartfelt Creations stamps...

But I only had one stamp set for the entire class.  Instead, I used the 2 medium sized petals as templates, which everyone used as tracers.

Cutting out all those petals might seem like a lot (20 for each sunflower) but it goes quickly because of the simple shape.  And all edges of the petals are inked with Vintage Photo Distress Ink.

The centres of the sunflowers are designed using black card stock, a SookWang adhesive sheet and black and copper Martha Stewart microbeads.
Trace and cut centres into 2 pieces each from both Sookwang sheet and black card stock.
In glitter tray or similar, remove inner section of sookwang piece and cover with black microbeads.

Mix black and copper beads together in small container.
Remove backing from outer part of centre and cover with copper/black beads.
NOTE:  The microbeads do not provide solid coverage, so I used black Bazzill card stock in the background.
The sunflower is one of my favourite flowers, so I am thrilled with the results!


The crow on the green journaling spot is from the Apple Cider clear stamp set...

I stamped the crow onto black card stock using Clearsnap Donna Salazar Inx and embossing powder in "Leather"...which turns coppery...

Now I can only hope and pray that I am able to get a decent shot of my teens for this year's fall photo shoot!  Fingers crossed :)

Thursday, July 5, 2012

Summer Toes and a Sketch

In my mind, I blog once a week.  In reality, it seems that I don't, and before I know it the month has disappeared and new sketch challenges have arrived.


I find I'm keeping my sketch layouts fairly simple, which is a refreshing change.  And a relaxed summer schedule helps to simplify my life at home.  I call it the 3 C's ....Cooking, Cleaning and Crafting.  Aside from the house stuff, I am outdoors a lot ...and on the computer a little.  Here up north, we have to take advantage of the short summer months!


For the Canadian Scrapbooker Sketchy Challenge, Jill Sarginson designed this wonderful sketch...


And I designed this summery fun page....


This is the first time I used Stampin Up papers, and I thought they were perfect for the bright colourful summer theme of my layout.  The background paper looks stamped with doilies, but nope, it's just one piece of patterned paper!


Along with the Stampin Up papers, I also used their pearls on the butterflies...


This is the alphabet stamp I used for the "Cute" letters in the title, called "Letter It"...

 The butterflies and journalling spot are created with Sizzix dies that are exclusive to Stampin Up...
I layered 2 of the butterflies....
And layered a white circle on top of the die cut for my journaling...

I stamped the title letters onto patterned paper, cut them out and popped them up on top of Stampin Up denim ribbon...
The "toe-tally" alphabet stickers and yellow lacy ribbon are from Harmonie.

If you haven't done so already, check out the BRAND NEW updated Sketchy Challenge gallery over at Canadian Scrapbooker.  Register as a member and you can interact in the forum, leaving comments and uploading your layouts.  Lots of inspiration!  Click HERE to check it out.


Now go paint your toes, slip on those cute summer sandals...and find a patio where you can relax with a cool drink :)  I LOVE SUMMER!!!!!!!!

Tuesday, May 1, 2012

Mother's Day Cards

When my turn came around again to do a blog post for Canadian Scrapbooker magazine this week, I was excited that the date was in May....because I wanted to share another flower technique and Mother's Day is coming up.

I was also excited about a new Spellbinders Donna Salazar die I bought called "Bitty Blossoms."
Spellbinders Donna Salazar "Bitty Blossoms"
I have been enjoying making my own simple spiral roses lately, and when I saw this die, I  wanted to give it a try.
Check.  It.  Out.  I am ALL OVER this Spellbinders die! 

I LOVED the results....I was making flowers day and night! (slight exaggeration)

I made a card featuring the simple spiral roses and another card using this Spellbinders die.....both with Karen Foster's Mother's Day patterned paper. 
Hmmmm....I just might have to give one of these to MYSELF on Mother's Day.


Here's a closer look at the roses on the card...
They are so pretty clustered together with a ribbon.
 If you'd like to see how I made both of these types of spiral flowers, I created a detailed step-by-step photo tutorial over at the Canadian Scrapbooker's website posted on Jackie's blog called "Tuesday With The Team."  Click HERE to see the tutorial.


Next week, I'll be posting a special framed Mother's Day layout on my blog that also features these Spellbinders flowers...and lots of other cool techniques!


Friday, April 27, 2012

My Mind's Eye is...AMAZING!

When I first saw the My Mind's Eye Follow Your Heart collection, I was smitten!  I immediately knew I wanted to design a class layout with the "Be Amazing" papers...just love those hexagon patterns!


Here is what I came up with...

I created some cool embellishments using Ranger Inkssentials Foil Tape Sheets and alcohol ink. 

Here are some close ups...
These buttons are part of this collection...I made the black butterflies using a Martha Stewart punch.

Love the dimensional stickers from this collection too!  And the ribbon is Maya Road.
 Making these foil embellishments was really fun.  I cut the sun freehand, but the butterflies and hearts are cut with Sizzix dies and my Big Shot.  

To make any of these elements, you'll need Ranger Foil Tape Sheets, alcohol inks, a piece of paper, dies, an embossing folder (I used a damask pattern by Tim Holtz), and a die cutting machine (Big Shot).
I coloured my sun and hearts with Caramel (or Butterscotch) alcohol ink and the butterflies with Stream.
Cut a piece of foil that will fit the size of your die, peel off the adhesive backing (CAREFUL:  very sticky!), and adhere to a piece of paper (you can use any piece of scrap paper).
I didn't use just any piece of scrap paper...I used a lovely extra piece of MME left over from my layout :)
 Trim the foil/paper piece so it can be cut by your die...

These butterflies are movable dies so they are sitting on a base tray (they are magnetic).
cu
Roll through your Big Shot and cut out the butterflies.

Place foil butterflies in damask patterned embossing folder and run through the Big Shot again.

And your butterfly will now look like this....I just LOVE how this foil tape embosses!

Gently squeeze Stream alcohol ink (or any colour you like) onto the butterfly.
Spread the alcohol ink using the tip of the bottle.  The more ink, the darker the colour.
 Because the foil is flexible, you can now play with your embellishments and bend them however you like....
I adhered only the centre of this butterfly with a pop dot and then lifted its wings off the page.
 The possibilities are endless with this "Amazing" line of papers by My Mind's Eye!

Sunday, November 6, 2011

Tim Holtz Meets Graphic 45

I suppose I am giving some of you a big SHOCK by designing Christmas cards.

If you're surprised about this, it's because you know I don't make many cards and have even been known to buy the Hallmark variety...Gasp!


I've always admired cardmakers who create spectacular pieces on such a small canvas.  So, when I was invited to teach a card class at Urban Scrapbook,  I thought, "Heck, yes! I'm going to give it a whirl!"

Using the new Graphic 45 Christmas Emporium collection and the Tim Holtz Mini Paper Rosette Sizzix die, I designed 5 cards and thought I'd share a few of the details with you.
The Graphic 45 Christmas Emporium paper pack...beautiful vintage papers!
 Here is the first card....
On Santa's Knee
The background is inked and embossed kraft paper, plus I used real Wood Veneer paper (Thin) from Creative Imaginations to design the mantle.
I used Fired Brick Distress Ink and the Prima Brick mask/stencil to alter the piece of kraft paper.
Then I embossed the "brick wall" with a Tim Holtz "Gridlock" embossing folder to create more texture...
After embossing, I lightly inked the raised design with Vintage Photo Distress Ink.
I also embossed the top of the wall with a Tim Holtz Wood Grain embossing folder...
...and inked the raised design again with Vintage Photo.
Close up of Wood Grain wall and wreath
The wreath is made with two medium rosette flower strips attached together.  I found it helpful to create a stable base for this wreath to sit on, so I made a "donut" out of scrap paper....
Here is the Paper rosette die I used on each card
The red ribbon is actually plain cream rayon ribbon (seam binding) coloured with Fired Brick Distress Stain.  Crumple it while still wet with the Stain and let dry in a crumpled ball to obtain the worn out vintage look.
Distress Stains come in so many different colours and allow you to transform any piece of seam binding!
The second card is called "JOY"...
I used 3 Tim Holtz dies to create this card....
I was a little sneaky with the "upon a time" alphabet and actually used the "Y" as the letter "J" because I didn't like the shape of the J in the original alpha.  Just cut off the arm of the Y and you have a J!! I should have been a rocket scientist...or a brain surgeon :)

The third card is named "Wishful Window" ....
The mother with children looking into a store window is an image from a piece of the Graphic 45 paper, which I fussy cut.  Then I framed the window with real Wood Veneer paper, inked with Walnut Stain Distress Ink.  The small mini rosette is accordion folded and adhered as an awning across the top of the window.
Off-white cardstock becomes swirly snow with a Tim Holtz "Swirls" embossing folder.
 The snow banks are cut and layered below the window. Then I added clear Stickles to the raised design to add some sparkle...
 This time I coloured the plain ribbon with Stormy Sky Distress Ink. 
To do this, you press the ink pad randomly on the ribbon (I didn't want solid coverage, so I missed some spots), put it in a plastic sandwich baggie, mist with water, then crumple and let dry.
Voila!  A lovely vintage blue ribbon is born!

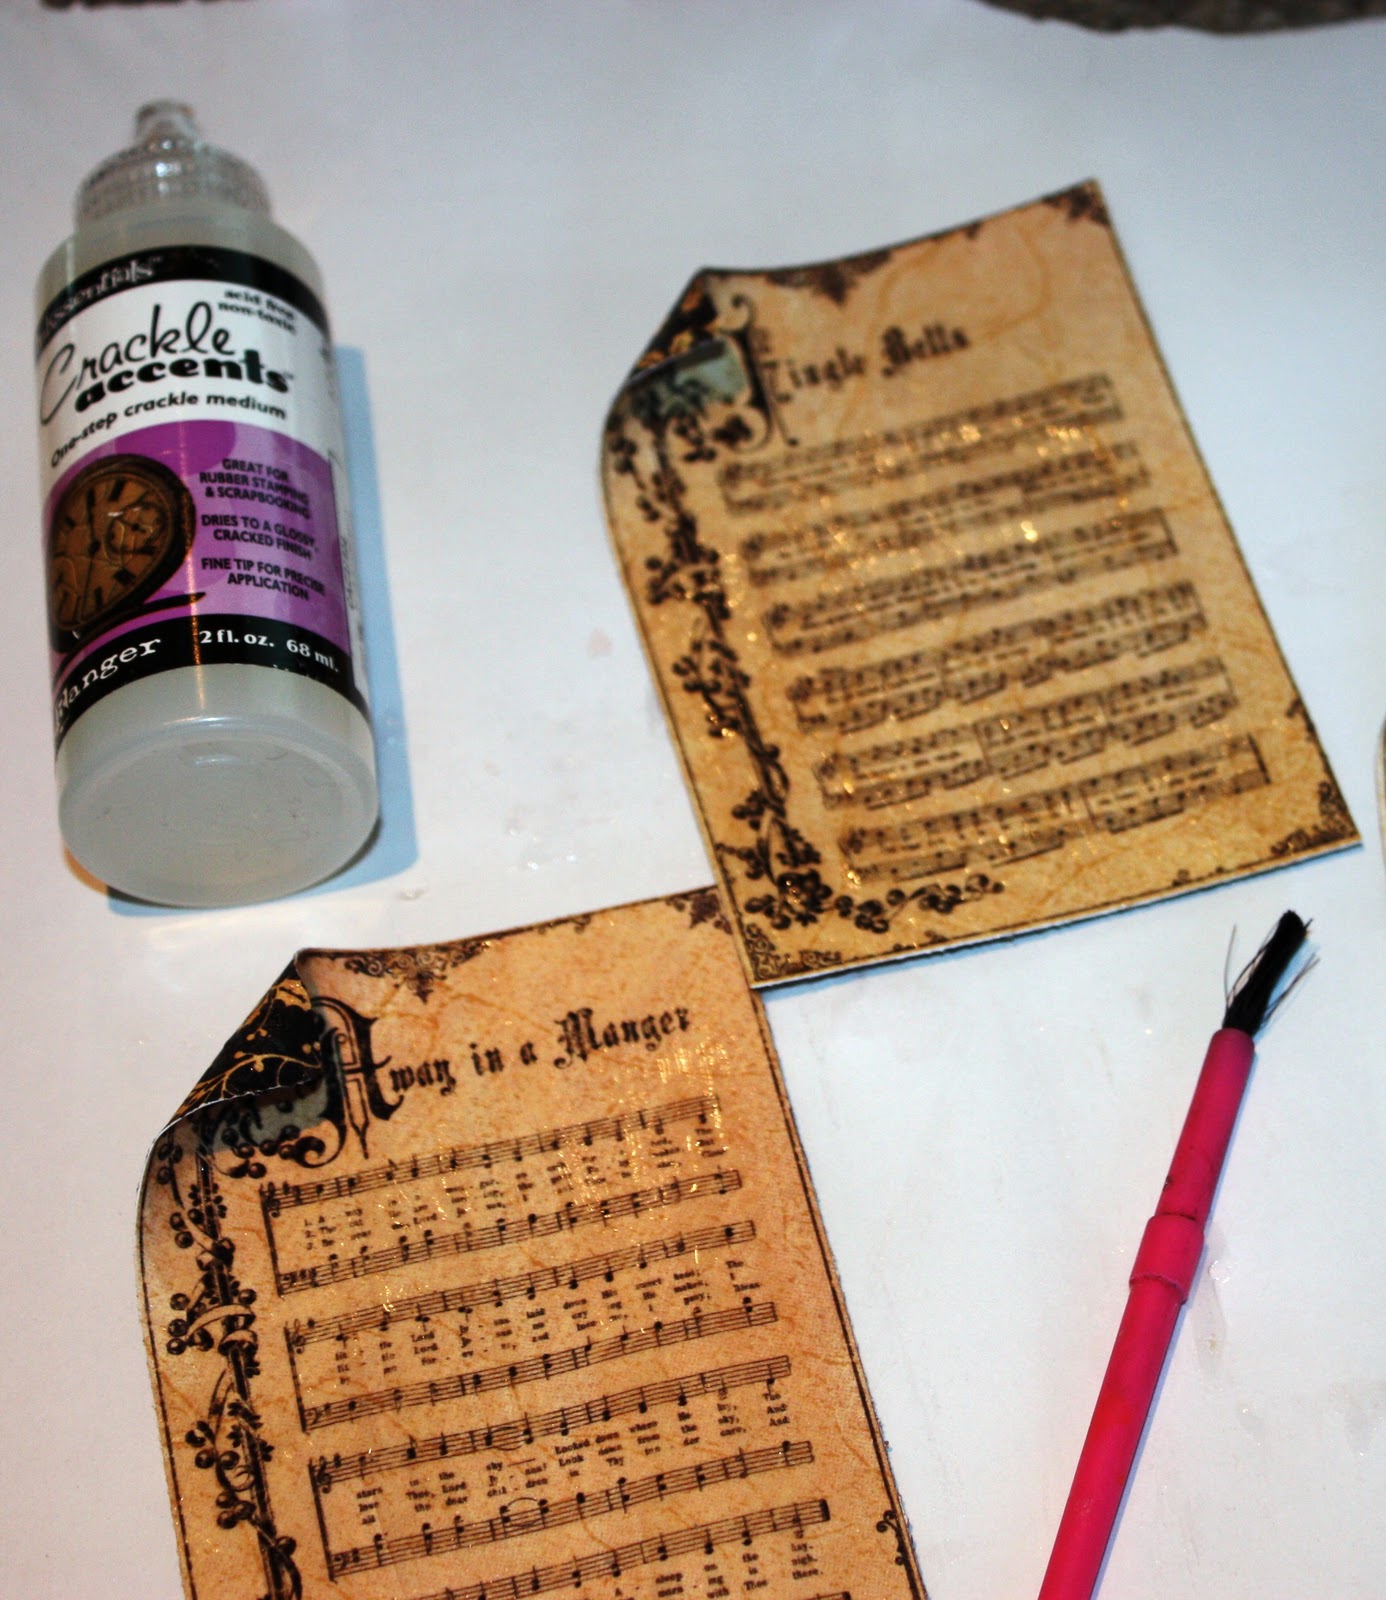
The fourth card is "Christmas Carols"...

To age the carol music paper pieces, I used Crackle Accents and Walnut Stain Distress Ink.
With a paint brush, add a medium thick coat of Crackle Accents and let dry completely, about an hour or more.
When the Crackle is dry, ink the whole surface with Walnut Stain, mist with water and wipe off with a tissue or paper towel. The dark ink stays in the cracks, making them more visible.  Now you have beautiful vintage music paper!

The die cut elements are from the new Tim Holtz Festive Greenery Sizzix die.....
I cut the pieces from off-white Bazzill cardstock
....and then transformed them with a variety of Distress Inks....magical!
All the inked pieces and a small paper rosette are adhered to a piece of black cardstock and sprayed with Perfect Pearls "Heirloom Gold".
I love this Festive Greenery die...so pretty and versatile!
The fifth and final card is titled "O Jolly Christmas Tree"...
I wish my kids looked like this on Christmas day :)
The Christmas tree is made with 2 medium rosette strips, separated into pieces...
TIP:  Ink all the pieces before you assemble and layer into a tree.
Sookwang tape is the best adhesive to adhere the tree layers together.
Stack up your layers and adhere along the accordion folds.
Adhere the sides of the tree rosette pieces so they lie flat and you get a tree shape.
Also, I cut a 4" x 2" triangle shape to use as a base for the tree...adhering the rosette tree to a base will stabilize it and help it keep a nice shape. Oh, and the tree trunk is a little strip of real Wood Veneer paper inked with Walnut Stain.
Side angle of flattened sides of tree.

Fabri-Tac liquid adhesive by Beacon Adhesives is wonderful for this because it dries VERY quickly.

I also use Fabri-Tac as the adhesive for all the rosettes.  Some people prefer a hot glue gun, but I'm not a big fan of burning off my fingerprints :)

Hope this inspires you to make some Christmas cards....or at least start your shopping :)

GIVEAWAY!!!!!!!!!!!!
And my early Christmas present to you....if you comment on this post and are a "Follower" of my blog, you will be entered to win a kit to make ALL these cards!! I'd also love to hear which card is your favourite :)  Thanks for visiting!