Showing posts with label Graphic 45. Show all posts

Tuesday, November 26, 2013

Brother's New ScanNCut

It's always fun to have a new product or scrapbooking tool to play with, isn't it?

I have just started working with the new Brother ScanNCut Machine and have designed this Christmas card:
I used Core'dinations Colorcore card stock for the wreath and "Noel" and the card base with patterned papers are from Graphic 45's new Christmas Collection "Twelve Days of Christmas."

It is being featured on the Canadian Scrapbooker Magazine blog, with lots of step-by-step photos showing the ScanNCut and design details.

Click HERE to visit the Canadian Scrapbooker blog to see more.

Click HERE to visit Brother's ScanNCut website that has more information, plus video tutorials. 

Stay tuned for more ScanNCut projects!

Saturday, September 14, 2013

Back To School !

It's that time of the year when all parents are kicking up their heels because it's Back to School! This summer I did enjoy not rushing around in the morning, worrying about missing the bus, forgetting books and lunches and telling the girls, "No, you can't wear  THAT to school!" ha ha

But routine is good for us, too, and now I will have more of a routine time to blog and scrapbook.

Here is a layout I designed for the Create & Connect trade show in Vegas, and it's up on The Crafty Power blog. I used 4 of the 3D foam Designer Shapes:  wings, stars, heart, and rectangle/frame:
I have a simple tutorial on how I made those red stars....so click HERE to visit their blog and check it out.  The papers are FancyPants Designs and the stamps are Stampin' Up! and Graphic 45 (alphabet). The silver glitter is EK Success/Martha Stewart.
Confession:  The photo is from last year's first day of school.  Here is this year's pics from last week:
BabyOfTheFamily is in Grade 8


DramaQueen is in Grade 11

BoyGenius heads off to University
Oh well, two out of three isn't bad. Ha!  

Thursday, May 9, 2013

May Sketchy Challenge

I decided to use the Canadian Scrapbooker May Sketchy challenge to design the June "Place in Time" Graphic 45 layout for my Mother's vintage album.

I know...a little out of order.  Today I'm sharing the April and June layouts, but the May page is coming later.

Here is Sue Syke's wonderful sketch...
I created a double layout by flipping the sketch for the right page....
I just love these photos from my mom's cousin's wedding. They are held in place with white photo corners from Scrapbook Adhesives by 3L.

Here are some close-ups...

Isn't that pearl centre on this flower gorgeous? It is a vintage clip-on earring from my mother, but I cut the backing off.
I used a Prima stencil and Golden Molding Paste with Glitter
I made a video showing details of this June layout and a tutorial with this mixed media technique.  Click HERE to watch this video on YouTube.

Here is my belated April layout...
These are pics of my  mom and her roommate visiting their friends on Easter who had young children.  If you look closely, you can see the kids holding Easter baskets.

The bling flourishes and butterflies are Prima (left over from my ScrapThat! May kit).

The chipboard fence is Twiddleybitz
The windows are cut from a piece of scrap white cardboard, and the bunny is cut from Glitter paper. The white stitching is "faux"...made with a white pen and paper piercer.  Sneaky! 

Luckily, my mom doesn't use a computer or follow my blog...otherwise the secret would be out on this album.  I love seeing how it's coming together, and I hope you do too!

I also hope you join in the Sketchy Challenge over at Canadian Scrapbooker....click HERE to visit their online forum.

Tuesday, April 16, 2013

A Place Called Home

I think everyone knows by now that I have a fondness for vintage layouts and heritage photos.  Lately, I've found myself gravitating towards my mother's scrapbooks, enjoying the beautiful black and white photos, trying to imagine her life "back in the day."

The Kaisercraft "75 Cents" collection seemed perfect for this layout...
This is the family my mom rented a room from when she was working as a single woman in a small country town.

For the design, I used this wonderful sketch from Sketchbook 365...
Some close-ups...
I layered some stickers, created the fence from strips of paper, and the key is K&Co.

These adorable little clips are Stampin' Up!

I used two alphabet stamp sets: the smaller one is Hero Arts and the other is Graphic 45

Here is a closer look at the roof...
I was inspired by my friend Michelle's birdhouse she recently designed.  Click HERE to visit her blog and see her amazing birdhouses.

Here is a simple tutorial  on how I made my roof:
Cut a triangle roof out of scrap card stock

Cover it with adhesive

Punch scallop edges on strips of paper

Stack up an arrangement of your strips so they will fit on your roof 

Layer the strips starting at the roof's bottom edge

Flip over roof and trim strips off along side edges

Gently curl up scallop edges for dimension
It's easy, isn't it?  Now you can tell your family and friends that you shingled a roof today!

Who said scrapbooking isn't labour intensive?

Thursday, April 4, 2013

Graphic 45 "March" Place in Time

I'm back from a warm and relaxing Spring Break vacation and am excited to get back into my studio!  Today I thought I would share my "March" Place in Time Graphic 45 vintage layout and a video featuring a technique for making watercolour flowers using Distress Markers.

My mother turns 85 in November, and I have decided to surprise her with a 12 x 12 photo album.  I'm using Graphic 45 "Place in Time" collection and duplicating photos from her vintage scrapbooks.  Mostly they are pictures of herself, friends and family around 1954 and 1955.  

I have already posted the January and February layouts, and I thought I'd share the album as I work on it.  So, here is March....

I was so excited to find these photos of my mother at a St. Patrick's Day party!  What luck!  Her roommate was Irish, so I can see why they had a party.

The technique featured on this layout is the watercolour flowers...
The flowers are cut with Spellbinders (Donna Salazar) "Rose Creations" die set

I made a video tutorial that shows how you can make these flowers, which I am thinking look like pansies or violets...either way they're purple flowers that match the floral images on the paper.

You can also click HERE to go to my YouTube channel and watch the video on a bigger screen.

I hope to be making more video tutorials in the future, so if you would like to "stay tuned" then click SUBSCRIBE while you are watching.  

I hope Winter is coming to an end wherever you live and that Spring weather has arrived!

Wednesday, March 13, 2013

Time Travel

Today I thought I'd share a few layouts I designed for my "Time Travel" article in the Spring issue of Canadian Scrapbooker magazine.

Creating heritage pages and vintage designs is one of my favourite styles of scrapbooking.

FabScraps was perfect to use for this layout "Farm Girls,"  featuring a photo of my mom and her cousin in the farm yard.  Why are they wearing pretty white dresses and playing outside?? It's probably Sunday!


I used The Crafter's Workshop chicken wire stencil and Stephanie Barnard/Clearsnap black spray on the background paper.
The title was cut with a Cricut.

The crocheted doily was bought at a garage sale last summer.

I coloured the chipboard elements with inks.

My next layout is made with beautiful Melissa Frances products....
The photo is my cousin Cindy who grew up on the same farm as my mom did!

To make this flower, I just covered a chipboard circle with liquid adhesive and wound the ribbon around.  Then I added a pretty pearl bling centre.
I also made some simple spiral roses...
The alphabet stickers and white resin pieces are also Melissa Frances.

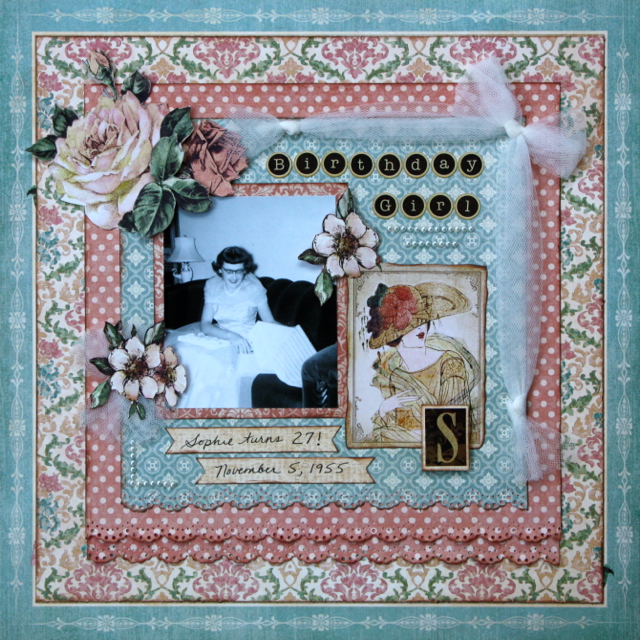
This last layout was designed with the gorgeous Graphic 45 "A Ladies Diary" collection....

My mom's 27th birthday!  Love her dress.

Here are some close-ups. 
I fussy cut these roses and leaves from the patterned paper.

The alphabet stickers are Graphic 45 too, and the pearls are Stampin' Up
A very sweet friend of mine, Michelle Marks, also used Ladies Diary and designed this gorgeous vintage tea box and mailed it to me for my birthday....


Click HERE to visit Michelle's blog and see a tutorial on how to make this tea box.  

I love it, Michelle!  Thank you so much.

And thank you, Canadian Scrapbooker, for giving me the opportunity to design and write "Time Travel." 

My heritage pages are precious to me, and I really enjoy sharing them with all of you.

Friday, February 8, 2013

Graphic 45 February Place in Time

It's no secret that I love designing with Graphic 45.  The vintage themes are so inspiring!  

When I saw the "Place in Time" collection, I wanted to use every single piece of paper, so I decided to create a 12 x 12 album for my mother, using photos from her scrapbooks.
My mother's precious scrapbooks
Her birthday is in November, so I have lots of time  to design the layouts.  Although I am teaching this album as a class at The Urban Scrapbook using double page layouts, I will only share the single pages and some techniques here on my blog each month. 

Here is my February layout...
Whoa Mom!  Two men...not one!
The large distressed heart in the top right is made with Tim Holtz Ideology Tissue Wrap and chipboard.  Here is how I created this special page element.

First, I cut a heart template from scrap paper and traced it onto a piece of chipboard.

 I tore off a piece of Tissue Wrap that was larger than the heart.


Using a foam brush, I applied Mod Podge all over the heart in a thin layer.


Crumple the Tissue Wrap and press it down all over the heart, scrunching it into wrinkles as you do so. 


Flip the chipboard heart over and apply Mod Podge to edges only.


Trim off excess Tissue Wrap and press down flat along the edges of the heart. 

Rub the entire ink pad of Aged Mahogany Distress ink across the Tissue surface of the heart.


Because the Tissue Wrap is somewhat resistant to colour, I rubbed off the excess ink with a dry baby wipe.
I wanted the colour to have more of a brown tone, so I added some Vintage Photo Distress Ink.
Remember to wipe off the excess ink.  You can continue to layer the ink like this until you achieve the desired colour.

On my layout, I backed the heart with a heart doily, that I found in the Dollar Store.  

I hope you have someone special in your life that you can give your own heart to this month :)