Sunday, August 28, 2011

Going...Going...Gone

It’s official.

BoyGenius took his road test. He passed….he has a DRIVER’S LICENSE.


I guess this means he did obey all the stop signs and red lights and shoulder checked and did not speed.

And I do have confidence in his driving because we have been driving together quite a lot lately.  At least, I had confidence until he uttered a fateful line after he found out he passed:

“Now I have the same license as you Mom, so I’m just as good a driver as you.”

Big sigh.

The funny part of this test experience today was that I left him at the local Registry to do the paper work and get his temporary license because I had to rush to the other end of the city to pick up his sister from her day camp.

So he had to WALK home. LOL! Well, I sure thought this was funny, but he didn’t quite see it that way.

Then the worst thing happened….he asked to use my minivan tonight so he can take his girlfriend out for supper to celebrate. Oh. My. Heavens. How could I not anticipate that question and all the emotions that came with it? I was not prepared for the rush of anxiety and fear. Mostly fear.

Some of you have probably gone through all this before, but for me it was an absolutely heart wrenching moment…to hand my keys over to him. GULP.
MY key...mine mine MINE!


So I stood on the driveway as he drove away and did what every scrapbooking mom would do. I grabbed my camera and took photos.
Going....
Going....
GONE.


These are the photos that break my heart.

Because not only is he driving away from me….he is officially leaving his childhood behind.
A safer mode of transportation, with his Grandpa steering.


I want my keys back, I want my van back….but most of all, I want my baby boy back.

Monday, August 22, 2011

Visiting Japan...with Creative Imaginations

It seems I'm getting a little carried away with my family anecdotes (and teenage horror stories), so I'm going to make a concerted effort to post more scrapbooking pages.

When I started this blog in June, I was working with the new Creative Imaginations "Sakura Collection" and created a couple of display layouts for my local scrapbook store Scrap-A-Lot.


I was pretty excited about these papers because back in the "olden days" (according to my kids), 1980 to be exact, I travelled to Japan on an exchange with the Lions Club.  All my photos and memorabilia from that 6-week trip are suffering their fate in a humongous magnetic album....yes, the kind where the plastic page cover lifts up and you place your photos on a sticky page background, knowing the contents will disintegrate within 10 years.

Ironically, however, I used a photo from a Scrap-A-Lot friend named Fran, who was also excited about scrapping her trip to Asia....which was much more recent than mine.  So while I was looking at her photos, I found the most lovely pic of cherry blossoms and was inspired to create this page for Fran.

Gosh, it was hard to photograph this shiny gold paper!
I wrote the Haiku...as I'm sure you all did in Grade 8 middle school English class...
The chipboard bird comes from a package of chipboard elements, all in neutral cream and brown...I added some gold metallic paint to coordinate with all the gold on the page.
 I cannot for the life of me remember the name of the package of chipboard...grrrrrr.
Just love working with the Melissa Frances elements...I gilded her white resin pieces.
For the pro scrapbookers out there, you can probably skip this next tutorial, but I thought I'd post LOTS of photos that show how I created this page.  Just because I always like lots of photos when I read a blog.  LOTS.

Here goes...
One of my favourite Martha Stewart border punches of all time...I punched the edges of the heavy gold metallic cardstock.
I gently lifted up the butterflies from the background glitter paper to give them dimension.
The thrifty scrapbooker cuts away the section of her background glitter paper that will be wasted and unseen beneath the gold metallic background paper.  I placed the gold cardstock on top of this pink glitter frame.
Yikes!  Who in their right mind wants to cut out ALL these lovely blossoms?
Not me!  My sweet super fussy cutting friend Kim, the owner of Scrap-A-Lot, cut this paper for me!
I placed these gorgeous floral cuttings on top of the gold cardstock.
I adore these Melissa Frances vintage embellishments!
To gild them (add gold accents), I simply used my metallic gold Ranger paint dauber.  That paint is the best and I use it all the time to add beautiful gold touches to lots of my page elements....you could say it's worth its weight in "gold"...hee hee!
Just touch the raised edges of the resin designs.
Here's a closer look of the finished result...
These corners ended up at the bottom of the gold metallic background as page corners.


I used the two floral gilded elements to frame the photo....


To weave the ribbon along the edges of the glitter cardstock mat, I punched holes with my Crop-a-dile...2 holes at about 1 1/2" intervals...and yes, I used a ruler to measure.

Yikes! that Crop-a-dile looks like a monster next to these delicate cherry blossoms...kinda like the Godzilla of scrapbooking tools!
A wide soft sheer pink ribbon worked well to create this effect....
Here is another photo I took of the page outside in the sunlight...so you could see it SHINE!


And now you know all the deep dark secrets behind creating this Cherry Blossoms layout!

Hope you enjoyed looking at LOTS of photos  :)

Sunday, August 14, 2011

Creative Cropping

For scrapbookers, there are two meanings of the word "crop".

1. A gathering of scrapbookers who enjoy each others' company while designing layouts.

2. Cutting a photo so it looks better.

I will be discussing number 2 and will attempt to explain how to cut your photo to make it more visually pleasing. You can "crop" with Photoshop, a trimmer, or even scissors.

You know there's a story behind this post, and it has to do with a recent mini weekend holiday my hubby and I enjoyed in July. 

We ditched the teenagers (if you're following my blog, you'll know why) and decided to spend a lovely 4 days, Friday to Monday, at our friends' new home on Lake Okanagan. (For my American friends, this is a gorgeous summer destination for lots of Albertans where it's hot hot hot and the drinks are cold cold cold.) Our friends live between Kelowna and Vernon in British Columbia.

Have you ever had a trip and felt it was just the most fabulous and even glamorous vacation experience? And then get home and your photos are disappointing and do nothing to prove that you looked great while you wined and dined?

Let me explain with some "creative cropping" and a couple of pics from our trip...

We had lunch on an amazing restaurant patio with a spectacular view of the vineyard and lake below....
YIKES!  All I can see when I look at this photo is that enormous ARM!!! Did someone inflate it?? The term "blow up doll" comes to mind.

Here's where cropping comes in handy....
The "Arm Liposuction" crop
Hmmmm...but there's a messy table with my camera bag.  Plus, I'm looking a little "top heavy". Let's improve this composition....
The "Breast Reduction" crop
If I want to highlight the dreamy landscape in the background, I could cut my photo like this
No inflatable arm detracting from this beautiful setting in the background
Just to prove that I am not a giantess with massive arms and breasts, here is a nicer photo that is not cropped at all.
In front of Gray Monk Vineyard Restaurant

Let's say your mini vacay did NOT go well.  You were angry with your husband and want to remember the trip without him in it....
The "Divorce" crop
Luckily, I did not have to perform the Divorce Crop because my hubby and I had the most wonderful time all weekend long.

And my final bit of cropping advice....don't overdo it.  Remember your photo might not be perfect but it always tells a story and captures that special moment in time....
Extreme Crop
The smile says it all :)

Tuesday, August 2, 2011

Miss Daisy...Still Crazy

The end is near.  BoyGenius (BG) wants to take his driving road test. GULP.

I do not want him to take this test.  Why?  Here are a few reasons....actually, here are some things he has said while practising his driving with me. [I am NOT making this stuff up]

What you do NOT want to hear when your 16-year-old son is learning to drive:

1.  [Spoken while shoulder checking]..."You know, mom, when I'm shoulder checking, I'm just turning my head around.  I'm not looking at anything."

2.  [After cruising through a 4-way-stop in our neighbourhood WITHOUT stopping]...."Was I supposed to stop there?  My bad."

3.  [His cell phone rings.  Yep, he answers it!!]..."Hello? Sorry, I can't talk right now. I'm driving.  Peace out." [The peace does go out at that  moment as I start yelling at him about answering his phone!]

4. [At a major intersection, we are first in the left turning lane.  The light is RED] ..."Can I go now?"

5. [During one of our many practice sessions] ..."When are you and dad going to buy me a car?" [I pretty much laugh out loud at this one]

6. [After I laugh about him asking for a car]..."There is no point in me practising my driving if you're not buying me a car!"

7. [During an angry silence]..."You know, when I get my own car, you will have no control over me, and you won't know where I am." [Well then.  Now we will DEFINITELY buy him a car.]


8. [After I correct a number of the above mistakes]..."Stop telling me what to do! I know how to drive!!"
I'll stop telling him how to drive when he figures out what this sign means!

The REALLY scary thing?? I know there LOTS more teenage boys out there driving who are just like him!

After I post this blog, I'm going to dye my hair, which has now gone completely grey. 

And then I'm going to slash the tires on my minivan...

Thursday, July 28, 2011

Creating with Prima and Ingvild Bolme

Last night I attended the most amazing class....taught by none other than the Queen of Prima herself, Ingvild Bolme!


Ingvild lives in Norway, but was in the U.S. for CHA and decided to come up north to teach a few classes! Thanks to Trisha Ladouceur, a Prima Educator, and Treasured Memories scrapbook store for organizing this wonderful event :)

Here is the gorgeous layout we made....
Ingvild's incredible design!
 All Prima goodies on this layout, and the best part was using Ingvild's new tools, which she designed for Prima...but they're not scheduled for release until October.
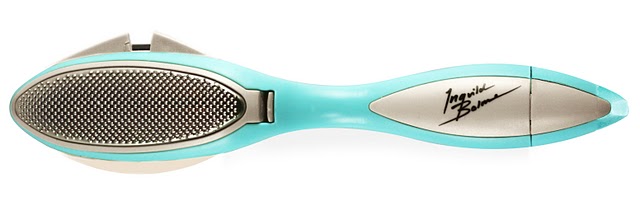
The amazing multi-distresser tool
Check out all the bits and pieces incorporated into this tool...
The end comes off to expose a metal brush.
I used the metal brush to distress the edges of my photo...
The stamped fence in the background is a new iron fence Prima stamp
The butterflies and delicate blue flowers on the right are rub-ons, and the red flowers are fussy cut with Ingvild's new craft knife.


I'm not big on using a craft knife, but this one is going on my shopping list!   


These edges were distressed with the tool and inked with Ingvild's new chalk inks.

Look at this cool ergonomic design...with a little handle!
Soooo easy to hold and manipulate! Loved these inks!
We added extra flowers along the Prima vine to create a lush floral border.
This class was a fabulous experience, and I was thrilled to meet Ingvild. 
That's what I love about the scrapbooking industry...it has become a global community, and we can share our passion for art and design all around the world!


Sunday, July 24, 2011

Mosquito Killer

It all started with a search for Scotch tape.

I have a small desk in my kitchen that has one drawer to hold pens, pencils, scissors...well, you get the idea.  This drawer is also supposed to have Scotch tape.....but of course, when I really need some tape and look in my drawer, I find nothing.

Whenever something goes missing, I go to BOF (BabyOfTheFamily).  She is often the culprit.  Upon questioning, her response is "I don't have any tape."

In reality, she THINKS she doesn't have the Scotch tape because she cannot SEE the Scotch tape in her mess of a room.  Even I cannot see the tape in her room because her desk looks like this...
The desk of a creative, yet tormented, soul


I try to ask nicely, "Clean up your room.  NOW."

BOF is a creative child with a wonderfully inventive imagination.  You know the saying that artists have "tormented souls"? Well, I beg to differ.  I say that the MOTHERS of artists are the ones who are "tormented."

Because when I return to BOF's bedroom to check on the clean up process, this is what I see...
Crime scene?  I guess I can't disagree with that.

I'd say the "Hand scan" is a bit much....
At least the sign is polite ("Thank You")
I'm pretty much ready to give up the search for the Scotch tape at this point.

But as I head out the door awhile later to run errands, I stop at the window in our mud room (small room for jackets and shoes and whatever else between the garage and our house).

What in heaven's name is on the window??
Look carefully.....can you see Scotch tape anywhere?
I lean in for a closer look....and am astounded by what I discover!
One dead mosquito...taped to the window.
Two dead mosquitoes
Three dead mosquitoes
Did I mention we have a mosquito infestation in our city right now?  And did I mention that BOF is horribly afraid of mosquitoes and will not touch them?  Her solution....kill the mosquitoes on the window with SCOTCH TAPE!!

You would think the most logical solution is the "Off" repellant that is sitting RIGHT ON THE WINDOW SILL!
Mosquito killer #1
Hey, here's another possibility....
Mosquito killer #2...the dreaded HAND!
Or even this handy dandy device that all insects FEAR...
Mosquito killer #3
But no....ALL of these solutions to the mosquito problem are much too simple, normal and logical!

An innovative mind chooses Scotch tape as a form of pest control.
Silly me.  I thought this product was for gift wrapping and fixing torn papers. 

The search for the tape is over....but the search for my sanity has just begun :)